How to add custom font to your blogger ?
To successfully choose your font, keep in mind that it must first and foremost allow you to read the text of your blog effortlessly .
If a reader is having trouble continuing to read, the font you have chosen is not correct. It is for this reason that the choice of the font is decisive for your blog, in particular to optimize the user experience of your website.
In this new tutorial, you will discover:
What are the default built-in fonts in Blogger? And how can you easily change them?
How to quickly add a new Google Font to your blog?
What fonts are included by default in the Blogger ?
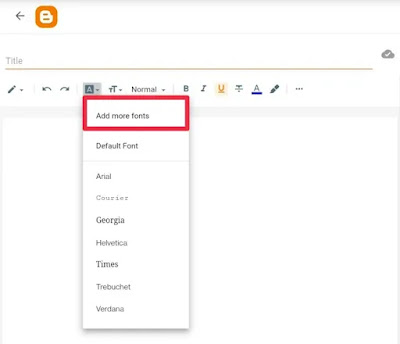
By default, Blogger integrates 7 fonts in the toolbar, namely: Arial, Trebuchet, Verdana, Helvetica, Georgia, Times and Courrier .
That said, you have the option of adding new fonts to your theme right in the Blogger Post Editor by simply clicking " Toolbar "> " Font Type "> " Add More Fonts "
Here are a few fonts used mainly in the body of the text :Tahoma , Arial , Trebuchet , Verdana , Helvetica , Georgia, Impact , Times New Roman , Calibri
In titles and headings , the most popular are : Open Sans, Oswald, Montserrat, Roboto, Roboto mono, Droid Sans
In the next section, I will first explain how to change the font in your posts using the toolbar in the editing step, then I will show you how to change it in your theme using of the Blogger theme creation tool.
Change the Font in the Blogger Post Editor
In your dashboard, click on "Posts" in the menu on the left of the screen, then on the circular button "+" at the bottom right of your screen.
In the article editor toolbar , click on the A "font type" button and choose the font to apply to the text of your article.
How to install a custom Google font in your blog ?
Many websites offer free download fonts like Fonts.com, Typekit, Dafont, etc. However, integrating them into your blog requires technical knowledge. It will first be necessary to convert and host the downloaded files and unfortunately this does not always succeed!
I therefore recommend that you opt for the Google Font Library which offers more than 950 fonts for free and in more than 150 languages. All fonts are copyright free, regardless of the purpose of your blog, personal or commercial.
All the fonts are hosted by Google which makes it easy to install them in your blog. Indeed, you just have to browse the fonts, select the one you want and then copy the embed code of the font and paste it into the HTML code of your theme. For clarity, I will present all these steps in pictures.
Go to the Google Web Fonts site first . The website is only available in English at this time.
In the interface of the Google Font website, the fonts are displayed randomly.
You can enter the name of the desired font directly in the search bar or use the various filters at the top of the page to refine your search.
Find your fonts easily by using filtres
These filters will allow you to specify:
The category of your fonts
- Serif : serif fonts, for example the famous Times New Roman font.
- Sans-serif : Sans-serif fonts, such as Arial or Verdana
- Handwriting : Typeface that mimics handwriting, e.g. Dancing Script, Indie Flower, etc.
- Display : more decorative fonts, especially used for titles (ex: Impact, Fraktur ...)
- Monospace : All the characters of this font take the same place, they have a fixed width (fixed width). We can cite by way of example: Roboto Mono, Cutive Mono, Major Mono Display, etc.
Language
- English, Hindi, Spanish, Chinese, Arabic, Japanese, etc.
Your font properties
- Number of Styles
- Thickness
- Slant
- Width
- Trending
- Most Popular
- Newest
- Name
Select your fonts and retrieve their Embed Code
When you've chosen your font, click the little red (+) button on the top right corner of each font to add it to your collection.
To open your collection, pull down the blackboard at the bottom of the screen by clicking on it.
The custom pane is used to show the levels of weight (the thickness of a line or a character) available for each font. Keep in mind that this can influence the load time of your pages. Choose only what you need.
For example :
- font-weight: 300 corresponds to light, light
- font-weight: 400 corresponds to normal
- font-weight: 700 corresponds to bold
- font-weight: 800 corresponds to extra-bold or black
The "Embed" pane allows you to copy the integration code, choose the standard code.
Now that you've copied the embed code, let's see how to add it to your Blogger theme.
How to Add the Google font Embed Code To Blogger
Step 1. Log in to Blogger
Step 2. Save a copy of your theme and display the search bar in the HTML code .
Step 3. Click on "Theme"> "Edit HTML code"
Step 4. A box containing the HTML code of your theme will be displayed
Step 5. Click anywhere inside the HTML code
Step 6. Then press Ctrl + F at the same time or Cmd + F for Mac, a small search bar should appear at the top right.
Step 7. Look for the code <head>in the search bar. Step 8 . Then insert the font code provided by Google font below the tag <head>.
Step 9. Now add the character / (Slash) just before the character >
Your code should look like this:
<link href = "https://fonts.googleapis.com/css?family=Open+Sans&display=swap" rel = "stylesheet" /> Step 10. Finally, save the changes made to your theme.
Resolve Parsing Error that Occurs while saving theme
If you encounter the following error indicated by the following message:
"XML parsing error, line 6, column 70: The reference to entity" display "must end with the ';' delimit ".
You must replace the following character & with &
If you don't want to make this change manually, you can use special character converter to easily do this:
Here is the code that triggers the error:
<link href = "https://fonts.googleapis.com/css?family=Open+Sans & display = swap" rel = "stylesheet" /> After correction, your code should look like this:
<link href = "https://fonts.googleapis.com/css?family=Open+Sans & amp; display = swap" rel = "stylesheet" /> Congratulation ! the font is integrated into your Blogger theme. You must now replace the old font with the new one.
Thank you for taking the time to read this tutorial. Feel free to share it on social media if you feel it might be useful for other people.
° ° °


Post a Comment